A Reasonably Modern Guide to Hacking Your Chromebook
Written by rainestorme with help from the Cognito Inc. teamTable of Contents
- Table of Contents
- Preface and Prerequisites
- I - Identifying Device Information
-
- Identifying chromeOS’s Release Milestone
-
- Identifying the Device’s Board
-
- Next Steps
-
- Next Steps - SH1mmer
-
- II - Setting GBB Flags (Pre-Tsunami)
-
- Removing the Back Cover
-
- Determining Write-Protect Type
-
- Disabling Write-Protect (CR50, battery)
-
- Disabling Write-Protect (CR50, jumper)
-
- Booting SH1mmer and Setting GBB
-
- Next Steps
-
- III - Setting GBB Flags (Ch341a)
-
- Removing the Back Cover
-
- Wait, Should I Remove the Motherboard?
-
- Removing the Motherboard
-
- Flashing New GBB Flags
-
- Replacing the Motherboard
-
- Replacing the Back Cover
-
- Next Steps
-
- Next Steps - Unenrollment
-
- IV - Flashing murkmod (SH1mmer-SMUT)
-
- Booting SH1mmer-SMUT
-
- Flashing murkmod
-
- Performing Initial Setup
-
- Configuring murkmod
-
- V - Unenrolling (SH1mmer)
-
- Booting SH1mmer
-
- Unenrolling
-
- What Now?
-
- VI - Installing murkmod (Devmode)
-
- Enabling Developer Mode
-
- Installing murkmod (Devmode Installer)
-
- Performing Initial Setup
-
- Configuring murkmod
-
- VII - Unenrolling (Devmode)
-
- Enabling Developer Mode
-
- Setting VPD
-
- What Now?
-
- VIII - Configuring murkmod
-
- Getting to Crosh
-
- Installing Recommended Plugins
-
- Properly Disabling Admin-Installed Extensions
-
- Installing the Aurora Store
-
- Installing the murkmod helper Extension
-
- What now?
-
- Appendix and Common Procedures
- A. Building SH1mmer
- B. Reverting murkmod
- C. Reverting Unenrollment
- D. Finding Recovery Images
- Credits
Preface and Prerequisites
“As long as a government can come and shoot you, you can’t jump on the Internet to freedom.”
-Esther Dyson
Chromebooks. Love them or hate them, we’ve all used one before - otherwise, you wouldn’t be reading this guide. The only problem is how terribly slow and laden with spyware they tend to be when under enterprise enrollment.
Okay, let’s cut to the chase. We both know why you’re here, and it’s not to read this (marvelously well-written) preface. Unfortunately, there’s some stuff that needs to be covered before we can continue:
This guide (the “Guide”) has been created purely for the purposes of academic research and for the development of effective defensive techniques. It is not intended to be used to attack, steal, or harm systems except where explicitly authorized. Project maintainers are not responsible or liable for misuse of the Guide or related software. Any personal, professional, or financial harm that may arise out of following the Guide is entirely the fault of the individual following the guide, not the authors. This guide involves disassembly of the target device (the “Device”), which will most likely void any and all warranties that are held over the Device. Use responsibly.
My lawyer told me to put that there.
Now that we’ve got that out of the way, let’s get to the fun part! This guide will involve some disassembly, and may require specialized hardware. Here’s a list of everything you could possibly need, regardless of your target device:
- A Ch341a USB flash programmer, SOIC-8 chip clip, and 1.8v adapter (can be bought here) - Note that if your device is newer it will most likely require a WSON-8 probe
- (Optional, for newer devices) A WSON-8 probe (can be bought here)
- A screwdriver
- A roll of electrical tape
- A USB drive, 32gb or larger - having more than one on-hand is helpful but not required
- An external Linux machine or VM to prepare payloads/flash firmware
- Wire and/or tinfoil
- (Optional, highly reccomended) ESD gear of some kind - I like to use the iFixit Portable ESD Mat
Got everything you need? Great. Let’s get started.
Continue to I - Identifying Device Information
I - Identifying Device Information
“Military intelligence is the key to war; without it, you cannot win.”
-Sun Tzu
In this section, we determine the necessary version and board information of the target device, which will be required later. If you already know this information, you can safely skip to Step 3.
1. Identifying chromeOS’s Release Milestone
If you are able to log into the device:
- Go to chrome://version and find
Google Chrome - Find the first number in the version string (see image below, underlined in red). This is your release milestone, or as it is sometimes referred to, your chromeOS version. For example, the release milestone of the device on which the below screenshot was taken is
103, or as it is commonly abbreviated,v103.

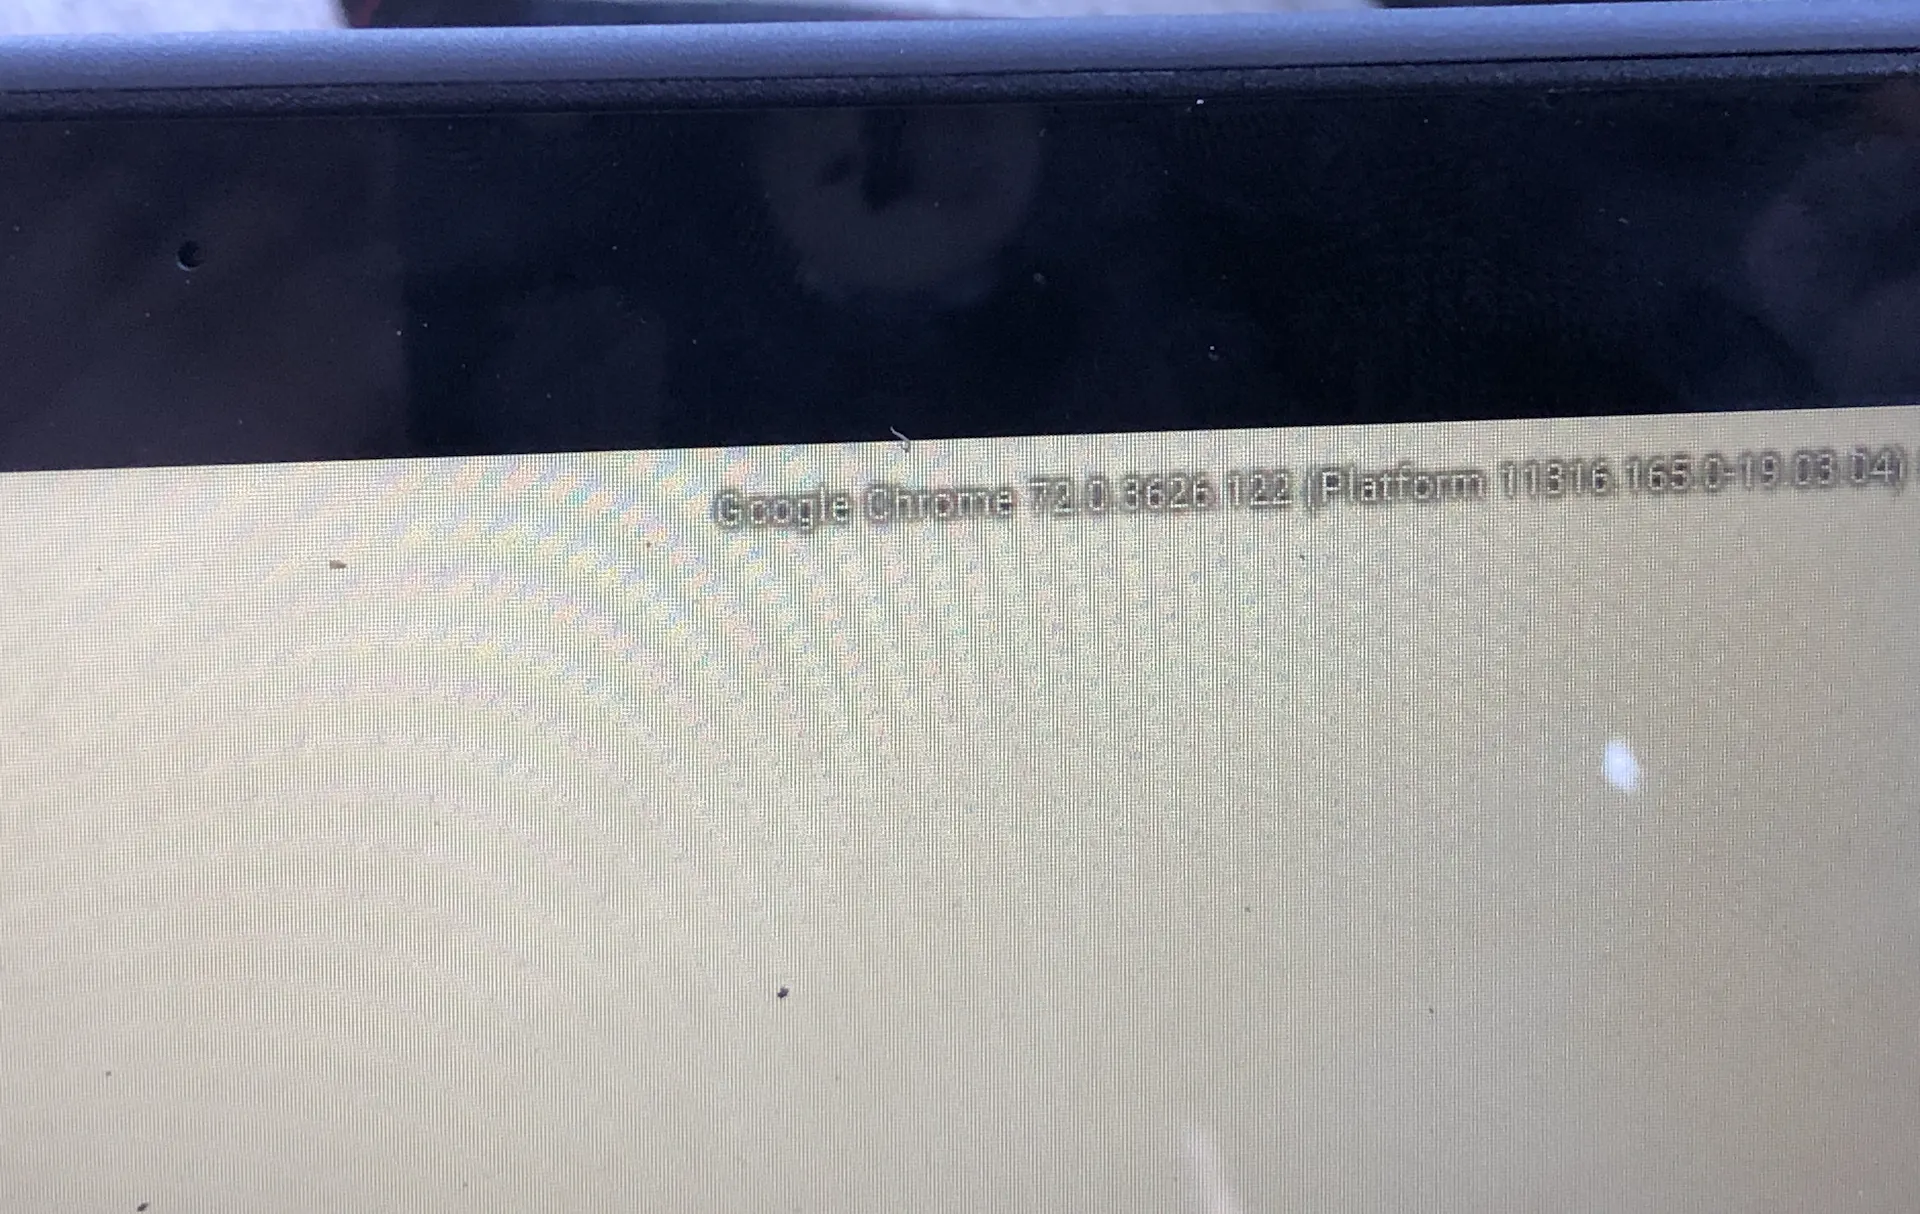
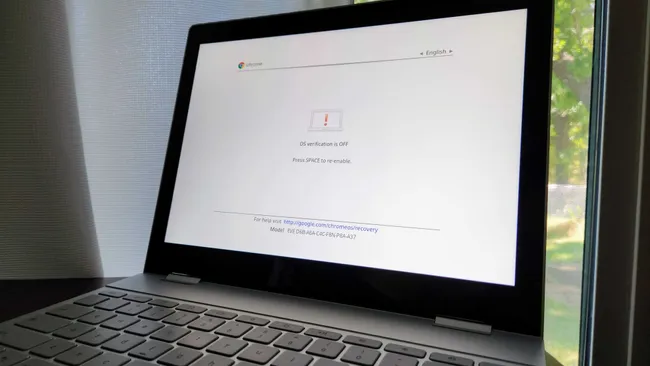
If you are unable to log into the device:
chromeOS’s version is visible on its login screen in the top right corner. Find the first number in the version string (see image below). This is your release milestone, or as it is sometimes referred to, your chromeOS version. For example, the release milestone of the device of which the picture below was taken is 72, or as it is commonly abbreviated, v72.
2. Identifying the Device’s Board
If you are able to log into the device:
- You should have already opened chrome://version in the last step. If not, open it now.
- Find the text after
stable-channel(see image below, highlighted in blue) and note it down. This is your board, and it is a denotation of the exact hardware configuration that the target device has. Also note down the text afterGoogle_- this is your device codename, and it is critical in later steps. In the case of the image below, that isfleex.
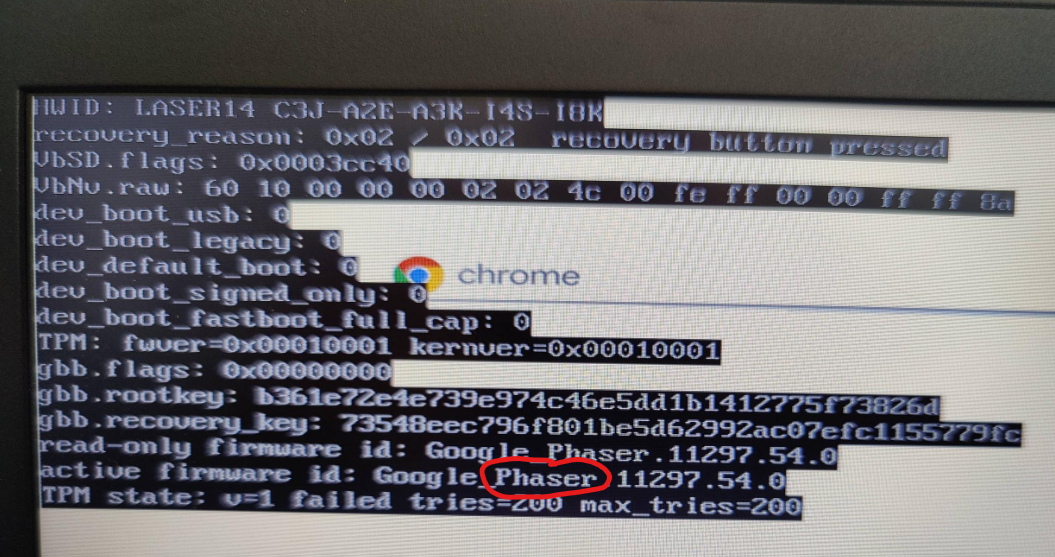
If you are unable to log into the device:
- Enter recovery mode.
- To do so, hold down
Esc+Refresh+Powerfor a few seconds, then release the keys. - The system will boot to a screen that prompts you to insert a USB drive or SD card. Ignore these instructions.
- To do so, hold down
- Press
Taband a debug overlay will appear (see image below). Find the row starting withactive firmware idand trace it across to the text afterGoogle_- you should write down the next word (your device’s codename), which in the case of the image below isPhaser. - Your codename should now be cross-referenced to the table at cros.tech. Once you find the correct row on the table, click it and look on the page for the board name (see second image below)

3. Next Steps
If your target device’s board is in this list:
- (A-B) ambassador, brask, brya
- (C) clapper, coral, corsola
- (D-E) dedede, enguarde
- (G) glimmer, grunt
- (H) hana, hatch
- (J-N) jacuzzi, kukui, lulu, nami
- (O) octopus, orco
- (P-R) pyro, reks
- (S) sentry, stout, strongbad
- (T-Z) tidus, ultima, volteer, zork
Then you should proceed to Step 4.
Otherwise, continue to III - Setting GBB Flags (Ch341a)
4. Next Steps - SH1mmer
Your target device is vulnerable to the SH1mmer exploit. Now, we must asses the current chromeOS version on the device to determine the next steps.
If your device is on a version lower than
v114, then continue to II - Setting GBB Flags (Pre-Tsunami)
If your device is on a version equal to or higher than
v114, then continue to III - Setting GBB Flags (Ch341a)
II - Setting GBB Flags (Pre-Tsunami)
““It strikes me that the only real reason to take apart a pocket watch, or a car engine, aside from the simple delight of disassembly, is to find out how it works. To understand it, so you can put it back together again better than before, or build a new one that goes beyond what the old one could do.”
-Kurt Busiek
This section requires use of a screwdriver appropriate to fit the case screws of your target device, usually Phillips or Torx.
In this section, we disassemble the device partially in order to disable hardware write-protect, then build SH1mmer and flash it to a drive in order to use it to set the GBB flags to unblock developer mode permanently.
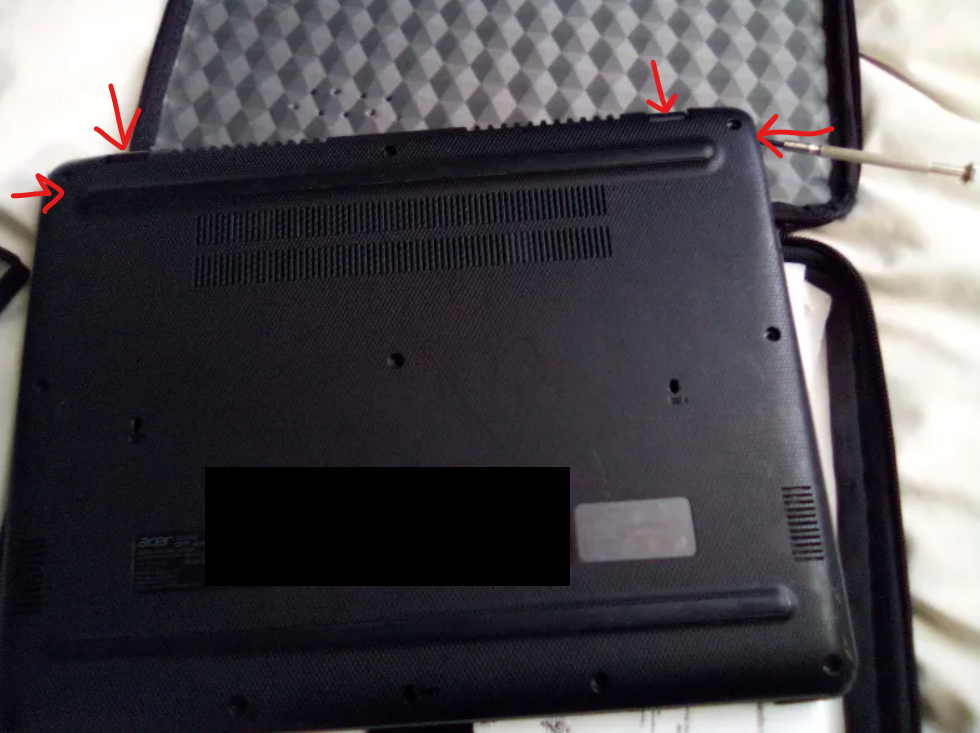
1. Removing the Back Cover
- Power off your target device and turn it over.
- Locate all the case screws and remove them (see image below for reference of an Acer Chromebook 712 - codename
kindred, boardhatch), making sure not to damage the ports for lubricant, marked by Xs below.

- Gently pry up the back cover.
- Placing your fingers or a small prybar or screwdriver under the screen joints tends to work well (see image below).
- Placing your fingers or a small prybar or screwdriver under the screen joints tends to work well (see image below).
- Optionally, you can take this opportunity to leave a little message on the inside of the case for the sake of posterity.
- Set the back cover aside, and you should now be able to see the motherboard.
2. Determining Write-Protect Type
- Visit MrChromebox’s Supported Devices list and press
Ctrl+Fto find your device codename on the page. - Look at the very rightmost column in the row for your device. This denotes the type of hardware write-protect the system uses.
This is where the path diverges.
If the target device uses CR50 (battery) write-protect, continue to Step 3
If the target device uses CR50 (jumper) write-protect, continue to Step 4
If the target device uses a different type of write-protect then those listed here, you are in a very rare scenario and should consult MrChromebox’s wiki page on the topic for more help, then continue to Step 5
3. Disabling Write-Protect (CR50, battery)
- Inside the guts of your target device, find the battery jumper and disconnect it (see image below).

- Push it aside (oftentimes tucking it slightly beneath the motherboard works nicely) and fit the back cover onto the back of the device again, not placing the screws back yet.
- Connect the power adapter to the device and boot it up.
Continue to Step 5
4. Disabling Write-Protect (CR50, jumper)
- Inside the guts of your device, locate the write-protect jumper (see image below).

- Take a wire or a piece of tinfoil and stuff it within the unpopulated jumper to bridge the two contacts.
- Fit the back cover onto the device again, not screwing it in yet.
- Connect the power adapter if necessary, and boot the system.
Continue to Step 5
5. Booting SH1mmer and Setting GBB
- If you do not already have a SH1mmer drive, follow the steps outlined in A. Building SH1mmer to build and flash one.
- Enter recovery mode (
Esc+Refresh+Power) and pressCtrl+D. PressEnterto enable developer mode (see image below).
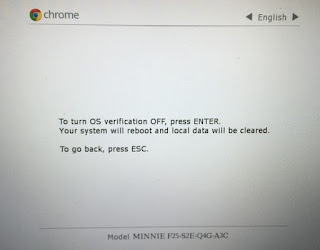
- Wait for the developer mode warning screen to appear (see image below) and enter recovery mode again.
- In recovery mode, plug in the USB drive with SH1mmer and wait through the brief text loading screen as it starts up.
- You should be at the menu below.

- Use the arrow keys to navigate and select
Payloads. Press enter, and you should be at a text-based menu. - Navigate to
Defogand press enter. - Upon completion of the payload, press
Refresh+Powerand remove the USB drive. - At the developer mode warning screen, press
Ctrl+Dto enter developer mode, and wait for it to enable. This will take 5 minutes (which is an arbitrary delay), and you can watch the timer in the top left of the screen. - When the warning screen reappears, press
Ctrl+Dagain to boot to the login screen. - Immediately, press
Ctrl+Shift+Alt+Rto begin a powerwash. The system will reboot multiple times during the course of the process, so pressCtrl+Dwhenever the warning screen appears. When the system boots again, DO NOT PROCEED WITH ENROLLMENT OR SETUP! Instead, immediately pressCtrl+Alt+Forward (F2)on the keyboard to enter the developer console. - In the developer console, login as the root user by typing out
rootand pressing enter. If you’re prompted for a password, entertest0000- the text will not appear but it will nevertheless be there. - Run these commands:
tpm_manager_client take_ownership
cryptohome --action=remove_firmware_management_parameters - Press
Ctrl+Alt+Back (F1)to exit the developer console and pressCtrl+Shift+Alt+Rto powerwash again. - After powerwashing is completed, press
Refresh+Powerto reboot and pressSpaceand thenEnterto disable developer mode. - Shut down the machine immediately afterwards by shutting the lid or placing a magnet by the lid sensor.
6. Next Steps
If your goal is to keep your device enrolled while still disabling extensions and having developer mode functionality, continue to IV - Flashing murkmod (SH1mmer-SMUT)
Otherwise, if you want to fully unenroll your device, continue to V - Unenrolling (SH1mmer)
III - Setting GBB Flags (Ch341a)
“Science isn’t about why - it’s about why not. Why is so much of our science dangerous? Why not marry safe science if you love it so much? In fact, why not invent a special safety door that won’t hit you in the butt on the way out, because you are fired!”
-Cave Johnson, Portal 2
This section requires use of a screwdriver appropriate to fit the case screws of your target device, usually Phillips or Torx, a Ch341a USB flash programmer, and a chip clip/probe appropriate for the type of flash that your Chromebook uses, usually 3v WSON-8 (for newer models). You will also need an external Linux device, preferably running Ubuntu 23.04 - other distros will work, but these instructions will not cover discrepancies.
In this section, we disassemble the device and remove the motherboard in order to flash custom GBB flags directly to the read-only firmware on the device.
1. Removing the Back Cover
- Power off your target device and turn it over.
- Locate all the case screws and remove them (see image below for reference of an Acer Chromebook 712 - codename
kindred, boardhatch), making sure not to damage the ports for lubricant, marked by Xs.
- Gently pry up the back cover.
- Placing your fingers or a small prybar or screwdriver under the screen joints tends to work well (see image below).
- Placing your fingers or a small prybar or screwdriver under the screen joints tends to work well (see image below).
- Optionally, you can take this opportunity to leave a little message on the inside of the case for the sake of posterity.
- Set the back cover aside, and you should now be able to see the motherboard.
2. Wait, Should I Remove the Motherboard?
This is a question I’ve been asked time and time again. Although kindred Chromebooks are used for reference throughout Step 3, you should not remove the motherboard of a kindred chromebook to reprogram your SPI flash chip. On kindred (and many other newer) devices, the flash chip is in a WSON-8 format on the front of the motherboard, and looks like the image below:

If you do not need to remove your motherboard to access the flash chip, skip to Step 4.
3. Removing the Motherboard
Heads up: If you have it, wear ESD gear - it will reduce the chances of you damaging your Chromebook while poking around inside.
- Looking at the guts of your Chromebook, identify the battery, the battery jumper, and the speaker cable. Unplug the battery jumper(s) and speaker cable (see image below).

- Remove the battery, being careful to not dislodge the touchpad if applicable for your device. Disconnect the touchpad and the USB jumper cables.

- Disconnect the drive or eMMC and the display, and remove the screws holding down the CPU cooler.

- Remove the CPU cooler and protective barrier, if present, and disconnect the final jumper holding down the motherboard.

- Remove all apparent screws holding down the motherboard, including those for the screen hinge. Verify that the motherboard is loose by gently tugging on it, being sure to not bend it if something is still holding it in place. Note that this step does not have a specific image since every Chromebook, even those with identical hardware, tend to have their motherboard screws in different positions.
- At this point, the motherboard should be fully loose from the rest of the hardware and you can pull it free. Set it on a safe, nonconductive surface that will not damage it, and if possible, wear ESD gear from this point onward.
4. Flashing New GBB Flags
- Boot up your Linux machine if you haven’t already. A VM with USB passthrough support will work just as well, as long as it doesn’t crash in the middle of the flashing process.
- (On older models) Identify the SPI flash chip on the bottom of the motherboard. It will be either an 8MB or 16MB chip, with the identifier [x]25Q64[xx] (8MB) or [x]25Q128[xx] (16MB) where [xx] is usually FV or DV and [x] is usually W. We do not want to touch the EC firmware chip, which is identified by W25X40[xx]. On newer models, there will not be two individual flash chips, only one primary one in a WSON-8 format.
- Attach the chip clip or probe to the flash chip, making sure the depression on the chip lines up with that of the clip or probe.

- Look at the top text on the chip that you located on your Chromebook. Look up a datasheet online and find the voltage of the chip. In the case of the bottom chip (blue PCB), it is a Winbond
25Q128JVPM. A quick search using the query"25Q128JVPM"yields: “W25Q128JV-DTR 3V 128M-BIT SERIAL FLASH MEMORY WITH DUAL/QUAD SPI & QPI & DTR”. DId you catch that? Right there - see it?3V. Some chips require 1.8 volts, so be careful not to overvolt your chip! If you are unsure of what voltage your flash chip uses, start with 1.8v and move to 3v if needed. - Assemble the Ch341a, 1.8v adapter (if needed) and wire the chip clip or probe to it. Make sure the pins are lined up correctly, and that pin 1 is consistent on both ends. See the second image below for a reference for the (mostly standard) wiring used by the Winbond flash chips found on most Chromebooks.


- Plug the Ch341a into your Linux device and open a terminal. Run
sudo suand enter your password if prompted. In the opened root shell, runflashrom -p ch341a. flashrom should identify the flash chip connected to the Ch341a (see output below) - otherwise, you should verify all connections and try again.

- Once
flashromsuccessfully identifies the flash chip, runflashrom -p ch341a -i GBB -r "./gbb.bin". This will dump the GBB (Google Binary Block) currently stored on the flash chip to your Linux system, which we will modify. - Make sure everything exited correctly and no errors were shown in the past step. After you’ve verified that, run
apt install vboot-kernel-utils(or the equivalent for your system’s package manager) and wait for the package to install. Runfutility gbb -s --flags="0x8091" "./gbb.bin"to set the GBB flags on the dumped file, and wait for it to complete.
Careful: this step writes to the flash chip and it is critical that you make sure it finished correctly before reassembling the device!
- Run
flashrom -p ch341a -i GBB --fast-verify -w "./gbb.bin"to flash the modified GBB image back to the device’s flash chip.
-IMPORTANT! Verify that the command completed without errors - otherwise, check your connections and try again. Continue retrying until the command reports back without errors. - Disconnect the chip clip or probe and bring the motherboard back over to the rest of the target device’s hardware.
5. Replacing the Motherboard
Confident you can do this yourself? Go right ahead - it should be the exact reverse of the steps above. Since you already know what you’re doing from before, I’ll just gloss over the steps required to replace the motherboard back in your target device:
- Place the motherboard down (ensuring its orientation - the CPU usually faces up) in the correct position in the case. Reconnect the jumper that sits underneath the CPU cooler.
- Screw in all motherboard screws in their original positions, including the hinge. Reconnect the display and the eMMC/NVME/SATA drive, then replace the CPU cooler (remember the protective barrier if it was there!) - making sure to screw it in tightly. If the heatsink/cooler is missing screws, find compatible ones and replace them - you’ll thank me later when you find yourself with a Chromebook that doesn’t overheat all the time.
Side note: now is a good time to make modifications to the cooling of the device - eg. replacing the fan or heatsink, adding custom components, etc.
Remember that any aftermarket parts are not guaranteed to fit and your mileage may vary depending on what components you may choose to add. Generally, custom design and manufacture (eg. 3D printing) of specific components to fit the exact model and dimensions of Chromebook you’re working with will be your best choice.
- Reconnect the touchpad and USB jumper cables, then place the battery back on top.
- Reconnect the battery and the speakers, then verify all the connections.
- After verifying everything is connected, continue to the next step.
6. Replacing the Back Cover
- Fit the back cover into the requisite position and gently push down until you can hear it clicking into place. Push at different locations on the back cover until it is firmly set on the device.
- Replace the screws, being careful not to damage the lubricant ports (see image below).
7. Next Steps
If your goal is to keep your device enrolled while still disabling extensions and having developer mode functionality, continue to VI - Installing murkmod (Devmode)
Otherwise, if you want to fully unenroll your device, continue to Step 8
8. Next Steps - Unenrollment
If your target device’s board is in this list:
- (A-B) ambassador, brask, brya
- (C) clapper, coral, corsola
- (D-E) dedede, enguarde
- (G) glimmer, grunt
- (H) hana, hatch
- (J-N) jacuzzi, kukui, lulu, nami
- (O) octopus, orco
- (P-R) pyro, reks
- (S) sentry, stout, strongbad
- (T-Z) tidus, ultima, volteer, zork
Then you should proceed to Unenrolling (SH1mmer).
Otherwise, proceed to Unenrolling (Devmode)
IV - Flashing murkmod (SH1mmer-SMUT)
This section is outdated and is only kept here for posterity. It is reccomended that you use the murkmod developer mode installer unless you plan to flash a large quantity of devices in a row with murkmod, or plan to re-flash later.
“Heh… SMUT… you know, that’s actually an acronym. Yeah, an acronym for SH1mmer Multiboot UTility. I did that on purpose - it’s funny as fuck - and I think MercuryWorkshop still hates me for it!”
-rainestorme
1. Booting SH1mmer-SMUT
- If you haven’t already, follow the instructions in A. Building SH1mmer to prepare a drive with SH1mmer-SMUT.
- Boot the target device and enter recovery mode.
- Hold down
Esc+Refresh+Powerfor 1 second and release it, then wait for the recovery screen to appear.
- Hold down
- Pres
Ctrl+DthenEnterto enable developer mode. - Immediately press
Esc+Refresh+Poweronce the system reboots. - Plug in the USB drive containing SH1mmer-SMUT.
- Wait for the boot process to complete.
2. Flashing murkmod
- Using the arrow keys, navigate to
Payloadsand press enter. - Navigate to
SMUT (Sh1mmer Multiboot UTility)and press enter. - At the prompt to defog, type
nand press enter. - At the SMUT menu, type
1and press enter. - Look at the printed list of recovery images on the SH1mmer-SMUT drive. Enter the exact name of the image you wish to use (you decided this earlier when building SH1mmer) and press enter.
- The process should begin after a 3-second delay. If an error is shown, press enter to display the output from
fdisk -land identify the correct drive from it - on most Chromebooks using eMMC, this will be/dev/mmcblk1, and on Chromebooks using SATA drives, this will be/dev/sda. Type out that drive name and press enter, once again making sure not to make any typos. - Wait for the process to complete. The target device will reboot automatically upon completion, and the system will boot to the developer mode warning screen.
3. Performing Initial Setup
- Press
Ctrl+Dat the developer mode warning screen and go through the enrollment process like normal. If enrollment fails with an error about not being able to obtain an enrollment certificate, continue following this step. Otherwise, you can skip directly to Step 4. - Press
Refresh+Powerand wait for the developer mode warning screen. PressSpaceand thenEnterto disable developer mode. - As soon as the screen backlight shuts off, press
Refresh+Power. Wait for the “ChromeOS is missing or damaged” screen to appear, then enter recovery mode once again and pressCtrl+DandEnterto re-enable developer mode. - Go through enrollment like normal, and this time it should work.
4. Configuring murkmod
Continue to VIII - Configuring murkmod
V - Unenrolling (SH1mmer)
“No prison can hold me; no hand or leg irons or steel locks can shackle me. No ropes or chains can keep me from my freedom.”
-Harry Houdini
1. Booting SH1mmer
If you haven’t already, follow the instructions in A. Building SH1mmer to prepare a drive with SH1mmer.
- Boot the target device and enter recovery mode.
- Hold down
Esc+Refresh+Powerfor 1 second and release it, then wait for the recovery screen to appear.
- Hold down
- Pres
Ctrl+DthenEnterto enable developer mode. - Immediately press
Esc+Refresh+Poweronce the system reboots. - Plug in the USB drive containing SH1mmer-SMUT.
- Wait for the boot process to complete.
2. Unenrolling
- Using the arrow keys to navigate, select
Utilitiesand press enter. - Navigate to
Un-enroll deviceand press enter. Wait for the process to complete, then pressRefresh+Powerto reboot the device. - Press
Spaceand thenEnterto disable developer mode, and wait for the system to boot into the setup flow. - At the setup screen, press
Ctrl+Shift+Alt+Rto powerwash the system. SelectPowerwash, then wait for the process to complete.
3. What Now?
At this point, the target device should be fully unenrolled and it should be usable as a personal Chromebook, free of all restrictions. What you do from here is up to you. Have fun!
View appendix entry C. Reverting Unenrollment for a guide on how to revert the device back to being enrolled.
VI - Installing murkmod (Devmode)
“Your work is going to fill a large part of your life, and the only way to be truly satisfied is to do what you believe is great work.”
-Steve Jobs
1. Enabling Developer Mode
- Enter recovery mode (
Esc+Refresh+Power) and pressCtrl+Dand thenEnterto enable developer mode. - Press
Ctrl+Dat the warning and then wait 5 minutes for the developer mode delay (there’s a timer in the top left).
2. Installing murkmod (Devmode Installer)
- Wait for the system to boot and connect to the Internet, then press
Ctrl+Alt+Forward (F2)to access the developer console. - Log in as the root user by typing
rootand pressing enter.- If prompted, the password is
test0000.
- If prompted, the password is
- Type
bash <(curl -SLk https://bit.ly/murkmod)and press enter. - Select your target version of murkmod from the presented menu, then wait for everything to be downloaded and installed. Press enter to confirm installation when prompted, then press any key to reboot the system. The system will boot to the developer mode warning screen.
3. Performing Initial Setup
- Press
Ctrl+Dat the developer mode warning screen and go through the enrollment process like normal. If enrollment fails with an error about not being able to obtain an enrollment certificate, continue following this step. Otherwise, you can skip directly to Step 4. - Press
Refresh+Powerand wait for the developer mode warning screen. PressSpaceand thenEnterto disable developer mode. - As soon as the screen backlight shuts off, press
Refresh+Power. Wait for the “ChromeOS is missing or damaged” screen to appear, then enter recovery mode once again and pressCtrl+DandEnterto re-enable developer mode. - Go through enrollment like normal, and this time it should work.
4. Configuring murkmod
Continue to VIII - Configuring murkmod
VII - Unenrolling (Devmode)
“The only thing we have to fear is fear itself. Oh, and also the IT department.”
-rainestorme
1. Enabling Developer Mode
- Enter recovery mode (
Esc+Refresh+Power) and pressCtrl+Dand thenEnterto enable developer mode. - Press
Ctrl+Dat the warning and then wait 5 minutes for the developer mode delay (there’s a timer in the top left).
2. Setting VPD
- Immediately after the system boots, press
Ctrl+Alt+Forward (F2)to access the developer console. - Log in as the root user by typing
rootand pressing enter.- If prompted, the password is
test0000.
- If prompted, the password is
- Type
vpd -i RW_VPD -s check_enrollment=0and press enter. - Type
vpd -i RW_VPD -s block_devmode=0and press enter. - Type
crossystem block_devmode=0and press enter. - Press
Ctrl+Alt+Back (F1)and then pressCtrl+Shift+Alt+Rto powerwash the system.
3. What Now?
At this point, the target device should be fully unenrolled and it should be usable as a personal Chromebook, free of all restrictions. What you do from here is up to you. Have fun!
View appendix entry C. Reverting Unenrollment for a guide on how to revert the device back to being enrolled.
VIII - Configuring murkmod
“It is not the strongest of the species that survive, nor the most intelligent, but the one most responsive to change.”
-Charles Darwin
1. Getting to Crosh
- Try to open crosh (
Ctrl+Alt+T). If you can’t open crosh due to an extension block, then create a new folder in your Downloads nameddisable-extensions. murkmod will automagically disable extensions so you can use crosh.
2. Installing Recommended Plugins
-
Open crosh (
Ctrl+Alt+T) and select “Install Plugins”. Use the arrow keys to navigate and select the following plugins:- Neofetch
- wssocks
- MAC Address Randomizer
- murkgui
- Stateful Cleaner
-
Press
qto exit.
3. Properly Disabling Admin-Installed Extensions
Select “Hard Disable Extensions” and, at the prompt, enter the extension ID corresponding to the extension you want to disable:
- GoGuardian -
haldlgldplgnggkjaafhelgiaglafanh - Securly -
iheobagjkfklnlikgihanlhcddjoihkg(webstore extension) orjoflmkccibkooplaeoinecjbmdebglab(non-webstore extension) - OrbitNote -
feepmdlmhplaojabeoecaobfmibooaid - Screenshot reader -
enfolipbjmnmleonhhebhalojdpcpdoo - Read and Write for Google Chrome -
inoeonmfapjbbkmdafoankkfajkcphgd - Gopher Buddy -
cgbbbjmgdpnifijconhamggjehlamcif - Clever Plus -
dikiaagfielfbnbbopidjjagldjopbpa - LightSpeed -
adkcpkpghahmbopkjchobieckeoaoeem - Cisco Umbrella -
jcdhmojfecjfmbdpchihbeilohgnbdci - ContentKeeper Authenticator -
jdogphakondfdmcanpapfahkdomaicfa - Hapara -
aceopacgaepdcelohobicpffbbejnfac - iboss -
kmffehbidlalibfeklaefnckpidbodff - LightSpeed Classroom -
jaoebcikabjppaclpgbodmmnfjihdngk - Blocksi -
ghlpmldmjjhmdgmneoaibbegkjjbonbk - Linewize -
ddfbkhpmcdbciejenfcolaaiebnjcbfc - Securly Classroom -
jfbecfmiegcjddenjhlbhlikcbfmnafd - Impero -
jjpmjccpemllnmgiaojaocgnakpmfgjg
4. Installing the Aurora Store
- Download the Aurora Store APK. Find it in your Downloads folder and double-click it. After a short wait, it will prompt you to confirm installing an “unsecure app”.
- Click Continue, and installation will commence. Confirm installation if prompted, and then launch the Aurora Store app from your launcher (press the
Searchkey). It will prompt you to perform initial configuration. Leave the default value for everything (except the color theme, feel free to mess with that). If prompted to log in, just select “Log in with Google” and sign in with your home account, or use an anonymous account provided by the Aurora Store.
5. Installing the murkmod helper Extension
- Download an archive of the murkmod repo from here and unzip just the
helperfolder into the very root of your Downloads folder. - Go to
chrome://extensionsand enable Developer Mode with the switch in the top right. - Select
Load Unpackedand select thehelperfolder you unzipped before. - Pin the murkmod helper extension to your toolbar, then click it to open the WebUI.
6. What now?
The target device is now fully configured to use murkmod with the recommended settings and plugins. From here, what you do is your choice. Have fun!
View appendix entry B. Reverting murkmod for a guide on how to revert the target device back to a stock state.
Appendix and Common Procedures
“I have not failed. I’ve just found 10,000 ways that won’t work.”
-Thomas A. Edison
A. Building SH1mmer
- On your Linux device, install the following packages:
git wget
- Run
git clone https://github.com/cognito-inc-real/sh1mmer-smut.gitand thencd sh1mmer-smut - Determine the variant of SH1mmer required for the procedure you’re following - either SH1mmer or SH1mmer-SMUT, depending on what the instructions call for.
- If using SH1mmer-SMUT:
- Determine the version you wish to use for murkmod. This is most likely
v105 (og),v107 (mercury),v117 (john), orv118 (pheonix), and I recommend eitherv105orv118(codenamesogandpheonix, respectively). - Download a recovery image for your board with the correct version from chrome100 or cros.tech. If you need help, see appendix entry D. Finding Recovery Images.
- Unzip the recovery image and rename it to
reco_image.bin. Move it to thetypewriterdirectory in the repository you just cloned. - Download a raw RMA shim for your board from the Darkn mirror, then unzip it in the
typewriterdirectory and rename it toraw_shim.bin. - Run
cd typewriterand then runchmod +x typewriter.sh. - Run
sudo ./typewriter.shand wait for the process to complete. This will take a while. Your completed shim will be located at/path/to/sh1mmer-smut/typewriter/sh1mmer_smut.bin.
- Determine the version you wish to use for murkmod. This is most likely
- If using SH1mmer:
- Download a raw RMA shim for your board from the Darkn mirror and unzip it to the
waxfolder in the repo you cloned. Rename the file tosh1mmer.binand runsudo ./wax.sh sh1mmer.bin. - Wait for the process to complete. Your completed shim will be located at
/path/to/sh1mmer-smut/wax/sh1mmer.bin
- Download a raw RMA shim for your board from the Darkn mirror and unzip it to the
- Flash the completed shim onto a USB drive sufficient for the size of the file.
- You can either use the Chromebook Recovery Utility (click the settings icon in the top right and select
Use Local Image) or a better program for your OS. - If you’re on *nix, you can just use
ddto flash the image to your USB drive:dd if=/path/to/sh1mmer.bin of=/dev/sdX status=progresswhere/dev/sdXis the path to your drive. - If you’re on Windows, use Rufus.
- If you’re on MacOS (Seriously?), use Etcher.
- You can either use the Chromebook Recovery Utility (click the settings icon in the top right and select
B. Reverting murkmod
- murkmod contains a function to instantly revert you to a stock install of chromeOS. To use it, either select it in the WebUI or open crosh and select
(8) Emergency Revert & Re-Enroll. - Confirm that you really do want to revert, then wait for the system to reboot.
- At the developer mode warning screen, press
Spaceand thenEnterto disable developer mode. - You are now fully re-enrolled. If you are exceptionally paranoid about your enterprise admins running deep scans on the device in question, you can also recover to a fresh install of chromeOS or run a chromeOS update, which will overwrite your previous murkmod install.
- You may also want to revert your GBB flags, which can be done by following the same process that you did to set them initially.
C. Reverting Unenrollment
- If you haven’t already, enable developer mode.
- Press
Ctrl+Alt+Forward (F2)to enter the developer console. - Open crosh and enter
shellto get to a bash shell. - Run these commands one at a time:
vpd -i RW_VPD -s check_enrollment=1
vpd -i RW_VPD -s block_devmode=1
crossystem block_devmode=1
echo "fast safe" > /mnt/stateful_partition/factory_install_reset
reboot
- The system will reboot and reset itself, and you will be re-enrolled after getting through the setup flow.
- If developer mode is not disabled automatically by the system, disable it manually by following the steps shown at the developer boot screen.
D. Finding Recovery Images
- You should know the board of your target device for this section, as well as the version for the recovery image you wish to download.
- If the version you want to download is within a few major revisions of the current latest version of chromeOS, go to cros.tech and enter your device’s codename.
- Otherwise, you should visit Chrome100 and find your board, then select the relevant version from the list that appears.
Credits
“Alone we can do so little; together we can do so much.”
-Helen Keller
The following people and groups greatly assisted with the development of this guide:
- Aw (
aw_somewhereon Discord) - Devices for testing - MercuryWorkshop - SH1mmer and much of the initial research reiterated in this guide
- MrChromebox - Unbricking guide and Ch341a reference
- The Chromium Project/ChromiumOS - Source code and references for how to change GBB flags on dumped firmware images
- Cognito Inc. and the Cognito Inc. Goon Squad - Helping with proofreading and writing of this guide